
Networking & Computer Hacks, Android phone apps & Games

Showing posts with label Windows. Show all posts

Saturday, 11 November 2023

November 11, 2023

Enhancing Windows Security: Speculative Execution Configuration Check Fixed


 Hello Windows Enthusiasts!


We understand the importance of keeping your Windows operating system secure, and that's why we're here to share valuable insights on a powerful security measure: Speculative Execution Configuration.


Speculative Execution is a performance optimization feature in modern processors that predicts and executes instructions before they are officially needed. While this boosts overall system speed, it has also raised security concerns. To help you fortify your Windows system against potential vulnerabilities related to speculative execution, we're introducing a simple yet effective configuration check.


Windows Speculative Execution Configuration Check

To implement this configuration, we'll be adding a specific registry key. Follow the steps below to ensure your Windows system is fortified against potential speculative execution vulnerabilities.


Step 1: Open Notepad


Open Notepad on your Windows system. You can do this by searching for "Notepad" in the Start menu or using the Run dialog (Win + R) and typing "notepad."


Step 2: Copy and Paste the Registry Key


Copy the following registry key information and paste it into Notepad:


plaintext

Copy code

Windows Registry Editor Version 5.00


[HKEY_LOCAL_MACHINE\SYSTEM\CurrentControlSet\Control\Session Manager\Memory Management]

"FeatureSettingsOverrideMask"=dword:00000003

"FeatureSettingsOverride"=dword:00002048

Step 3: Save the File


Save the file with a ".reg" extension. For example, you can name it "SpeculativeExecutionConfigCheck.reg." Ensure that you select "All Files" as the file type when saving.


Step 4: Run the Registry File


Double-click on the saved ".reg" file and confirm any prompts that appear. This will add the specified registry key to your Windows system.


Congratulations! You've now enhanced your Windows security by configuring speculative execution settings.


Why This Matters

By configuring speculative execution settings, you add an additional layer of defense against potential security threats. This measure helps safeguard your system by controlling how speculative execution is handled.


We recommend performing this configuration check regularly, especially after major updates or changes to your system, to ensure your Windows OS remains secure.


Stay secure, stay informed!


Note: Modifying the Windows Registry can impact system stability. Ensure you have a backup before making changes and consult with IT professionals if needed.

Friday, 10 November 2023

November 10, 2023

Mitigating WinVerifyTrust Signature Validation CVE-2013-3900 Vulnerability with Batch File

 In the realm of cybersecurity, staying ahead of potential threats is crucial to maintaining a secure computing environment. One vulnerability that has caught the attention of security experts is the WinVerifyTrust Signature Validation CVE-2013-3900. To mitigate this vulnerability, one effective solution involves creating and implementing a batch file to adjust specific registry values. This post will guide you through the process.


Step-by-Step Guide: Creating Batch File for WinVerifyTrust Signature Validation CVE-2013-3900 Mitigation


1. Open a Text Editor

Begin by opening a text editor of your choice, such as Notepad or any code editor.


2. Copy and Paste the Batch Script

Copy the following batch script into your text editor:


batch

Copy code

@echo off


REM 32-bit registry path

set RegPath32=HKEY_LOCAL_MACHINE\Software\Microsoft\Cryptography\Wintrust\Config


REM 64-bit registry path

set RegPath64=HKEY_LOCAL_MACHINE\Software\Wow6432Node\Microsoft\Cryptography\Wintrust\Config


REM Set the value for EnableCertPaddingCheck

set Value=1


REM Add and enable registry value for 32-bit system

reg add "%RegPath32%" /v EnableCertPaddingCheck /t REG_DWORD /d %Value% /f


REM Add and enable registry value for 64-bit system

reg add "%RegPath64%" /v EnableCertPaddingCheck /t REG_DWORD /d %Value% /f


echo Registry values added and enabled successfully.

pause

3. Save the File

Save the file with a ".bat" extension. For example, you could name it "CVE-2013-3900_Mitigation.bat".


4. Run the Batch File as Administrator

To apply the mitigation, right-click on the saved batch file and choose "Run as Administrator." This ensures that the script has the necessary permissions to modify the registry.


5. Verify the Changes

After running the batch file, you can verify the changes by checking the registry entries at the specified paths. The value for "EnableCertPaddingCheck" should now be set to "1."


Conclusion

By following these steps, you've created and executed a batch file to mitigate the WinVerifyTrust Signature Validation CVE-2013-3900 vulnerability. Regularly monitoring and addressing such vulnerabilities are crucial components of a robust cybersecurity strategy.


Note: Modifying the registry can have system-wide effects, so it's essential to exercise caution and create a backup before making any changes.


Stay vigilant, stay secure!

Sunday, 1 September 2019

September 01, 2019

6 ways to clean Windows 10 disk space.

6 ways to clean Windows 10 disk space.

6 ways to clean Windows 10 disk space.

Finding a third-party disk cleaning tool for Windows 10? You don't need to, Windows 10 come's with lots of pre-install cleanup tools. Follow instructions as blow.

1. Check for low disk space

  1. Select the Start  button, then select Settings  > System  > Storage .
    Open Storage settings
  2. Your drives will be listed in the Storage area. Note the amount of free space and total size for each drive.


Note

If your PC is not low on space, try the next tip.

You can use Storage Sense to delete unnecessary or temporary files from your device, which can also free up space. 
If you turn on Storage Sense, Windows will automatically free up space by getting rid of unnecessary files—including files in your recycle bin—when you're low on disk space or at intervals you specify. The instructions below show you how to delete temporary files and how to turn on and configure Storage Sense.
If you can't find Storage Sense on your device using the following steps, see the "Free up space with Disk cleanup" section below instead. 
Note

You may not want to delete temporary files to improve performance. While these files may not be used at the moment, they help your apps load and run faster.


2. Temporary files with Storage Sense

  1. Select the Start  button, then select Settings  > System  > Storage .
    Open Storage settings
  2. Select Temporary files in the storage breakdown. Note: If you don't see Temporary files listed, select Show more categories
  3. Windows will take a few moments to determine what files and apps are taking up the most space on your PC.
  4. Select the items you want to delete, and then select Remove files.
To see what's in your Recycle Bin before you empty it, open it from your desktop. If you don't see the Recycle Bin icon  on your desktop, in the search bar on the taskbar, type recycle bin, then select Recycle Bin from the list of results. 


Note

Windows moves files you delete to the Recycle Bin in case you change your mind and need them again in the future. You might be able to free up a significant amount of space by deleting Recycle Bin files to permanently remove files you've previously deleted.

3. Turn on and configure Storage Sense

  1. Select the Start  button, then select Settings  System  Storage .
    Open Storage settings
  2. In the Storage area, turn on Storage Sense.
  3. Select Configure Storage Sense or run it now.
  4. In the Storage Sense area, choose how often you want Storage Sense to run.
  5. In the Temporary Files area, select Delete temporary files that my apps aren't using
  6. Select which files you want Storage Sense to delete (your choices are files in your Recycle Bin and in your Downloads folder), then select the corresponding time intervals.
  7. Scroll down and select Clean now
  8. Windows will take a few moment to clean up your files, and then you'll see a message indicating how much disk space has been freed up.
If your system doesn't have Storage Sense, you can use the Disk Cleanup tool to delete temporary files and system files from your device.

4. Run Disk Cleanup

  1. In the search box on the taskbar, type disk cleanup, then select Disk Cleanup from the list of results.
  2. Select the checkbox next to the type of files you want to delete. (To view a description of each type of file, select the name.) By default, Downloaded Program FilesTemporary Internet Files, and Thumbnails are selected. Be sure to clear those check boxes if you don't want to delete those files.
  3. To free up even more space, select Clean up system files. Disk Cleanup will take a few moments to calculate the amount of space that a can be freed up. 
  4. Select the types of files you want to delete, select OK, then select Delete files in the confirmation window to start the cleanup.
If your PC still runs slowly, try uninstalling apps you don't use anymore.

5. Uninstall apps you don’t use anymore

  1. Select the Start  button, then select Settings  > Apps  > Apps & features.
    Open Apps & features settings
  2. Search for a specific app or sort them to see which ones are using the most space.
  3. When you find an app to remove, choose it from the list and select Uninstall.
  4. Restart your PC and and see if performance has improved.
If your PC still runs slowly, try moving files to another drive.
If you have photos, music, or other files that you want to keep but don't use often, consider saving them to removable media, like a USB drive. You'll still be able to use them when the drive is connected, but they won't take up space on your PC.

6. Move files to another drive

  1. Connect the removable media to your PC.
  2. Select File Explorer   from the taskbar and find the files you want to move.
  3. Select the files, go to Home, then select Move to > Choose location.
  4. Select your removable media from the location list, then select Move.
  5. Restart your PC and see if performance has improved.

Saturday, 31 August 2019

August 31, 2019

10 way to improve Windows 10 performance

1. Make sure you have the latest updates for Windows and device drivers
One of the best ways to get the most out of your PC is to make sure you have the latest version of Windows 10 installed. When you check for updates, your PC will also search for the latest device drivers, which can also help improve your PC’s performance.
To check for updates
1.     Select the Start  button, then select Settings  > Update & Security  > Windows Update  > Check for updates.
2.     Do one of the following:
         If the status says "You're up to date," go to the next tip.
         If the status says "Updates are available," select Install now.
3.     Select the updates you want to install, then select Install.
4.     Restart your PC and see if it seems to run better.
2. Restart your PC and open only the apps you need
Having many apps, programs, web browsers, and so on open at once can slow down your PC. Having a lot of browser tabs open at once can also slow it down quite a bit. If this is happening, close any apps, browser tabs, etc., that you don't need and see if that helps speed up your PC. If it doesn't seem to help, restart your PC and then open just the apps, programs and browser windows you need.
To restart your PC
1.     Select the Start  button, then select Power  > Restart.
2.     After your PC restarts, open just the apps you need, then close them when you’re done.
Sometimes apps that were made for an earlier version of Windows will still run on Windows 10, but they might slow down your PC. If this happens after you open a certain program, check the software company’s website for an updated version, or run the Program Compatibility Troubleshooter.
To run the Program Compatibility Troubleshooter
1.     In the search box on the taskbar, type troubleshoot, then select Troubleshoot settings, which has System settings listed underneath it.
2.     In the list of troubleshooters, select Program Compatibility Troubleshooter > Run the troubleshooter.
3.     Select the program that you’re having problems with, then select Next and continue through the troubleshooter.

3. Use ReadyBoost to help improve performance
ReadyBoost lets you use a removable drive, like a USB flash drive, to improve your PC’s performance without opening your PC and adding more memory (RAM). To use ReadyBoost, you’ll need a USB flash drive or a memory card that has at least 500 MB free and a high data transfer rate.
To use ReadyBoost        
1.     Insert the USB flash drive into a USB port on your PC.
2.     Select File Explorer  from the taskbar.
3.     Press and hold (or right-click) the USB flash drive (or SD card if you used one instead), then select Properties.
4.     Select the ReadyBoost tab, then select Use this device.
Windows determines if the device can use ReadyBoost. If it can’t, it'll let you know.
5.     After Windows determines how much free space to use to optimize memory, select OK to reserve this space so ReadyBoost can use it.
When you look at the contents of the USB flash drive in File Explorer, you’ll see a file named ReadyBoost.sfcache on the flash drive. This file shows how much space is reserved for ReadyBoost.
Note
ReadyBoost can't be used if Windows is installed on a solid state drive (SSD). An SSD is already fast, and ReadyBoost won't be able to improve its performance.
4. Make sure the system is managing the page file size
The paging file is an area on your hard disk that Windows uses like memory. There's a setting in Windows 10 that manages the page file size automatically, which can help improve your PC’s performance.
To make sure automatic page file management is turned on
1.     In the search box on the taskbar, type advanced system, and then select View advanced system settings, which has Control panel listed underneath it.
2.     In System Properties, select the Advanced tab, then select Settings in the Performance area.
3.     In Performance Options, select the Advanced tab, then select Change in the Virtual memory area.
4.     Make sure the Automatically manage paging file size for all drives check box is selected. If it is, continue to the next tip. If it's not, select it and then restart your PC by selecting the Start  button > Power  > Restart.
5. Check for low disk space and free up space
You may improve performance if you free some disk space on your PC.
To check for low disk space
1.     Select the Start button, then select Settings  > System  > Storage .
2.     Your drives will be listed in the Storage area. Note the amount of free space and total size for each drive.
Note
If your PC is not low on space, try the next tip.
You can use Storage Sense to delete unnecessary or temporary files from your device, which can also free up space.
If you turn on Storage Sense, Windows will automatically free up space by getting rid of unnecessary files—including files in your recycle bin—when you're low on disk space or at intervals you specify. The instructions below show you how to delete temporary files and how to turn on and configure Storage Sense.
If you can't find Storage Sense on your device using the following steps, see the "Free up space with Disk cleanup" section below instead.
Note
You may not want to delete temporary files to improve performance. While these files may not be used at the moment, they help your apps load and run faster.
6. Adjust the appearance and performance of Windows
Windows 10 includes many visual effects, such as animations and shadow effects. These look great, but they can also use additional system resources and can slow down your PC. This is especially true if you have a PC with a smaller amount of memory (RAM).
To adjust the visual effects in Windows
1.     In the search box on the taskbar, type performance, then select Adjust the appearance and performance of Windows in the list of results.
2.     On the Visual Effects tab, select Adjust for best performance > Apply.
3.     Restart your PC and see if that speeds up your PC.
7. Pause OneDrive syncing
Your PC settings let you choose where files will be saved by default. You can save files on your PC or to OneDrive by default and sync files between the two locations. This lets you get to your files from any device that can connect to the internet, and it helps make sure your files are backed up in case your PC is ever damaged or lost. However, files must sync between your PC and OneDrive, and syncing can slow down your PC. You can pause OneDrive syncing temporarily and see if it helps improve your PC performance.
To stop syncing to OneDrive
1.     On the taskbar, look for OneDrive  near the notification area.
2.     Select OneDrive  > More  > Pause syncing, and then choose how long you want to pause syncing your files.
3.     Restart your PC and see if your performance issues have improved with syncing paused.
4.     To resume syncing your files, select OneDrive  > More  > Resume syncing.
You can also visit Fix OneDrive sync problems to check for any sync issues.
Note
If you have Window 10 version 1709 or higher, you can use OneDrive Files On-Demand to choose which files you want to sync and always keep on your PC. This can help improve PC performance if you reduce the number of files that are synced to your PC. To see which version of Windows 10 your device is currently running, select the Start  button, then select Settings  > System  > About.
8. Disable unnecessary startup programs
When you turn on your PC, some programs start automatically and run in the background. You can disable these programs so they don’t run when your PC starts.
Many programs are designed to start automatically when Windows does. You don’t realize they're running, but they'll open quickly when you go to use them. This is helpful for programs you use a lot, but not for programs you don’t use often because it increases the time it takes Windows to start.
Find the programs that start automatically
Sometimes you can determine which programs start automatically by looking at the program icons in the notification area on the far right of the taskbar. Check there first to see if there are any programs running that you don’t want to start automatically. To try to find out the name of the program, point to the icon with your mouse pointer. Make sure you select Show hidden icons , so you don’t miss any programs.

Notification area with mouse pointing to show hidden icons
Even after you check the notification area, you might still miss some programs that run automatically at startup. Here’s how you can find all the programs that start automatically, and stop the ones that you don’t want to start automatically when Windows starts.
To stop a program from starting automatically
1.     Select the Start  button, then select Settings  > Apps  > Startup .
2.     In the Startup Apps area, find the program you want to stop from starting automatically and set it to Off.
Notes
         If you turn off a program and it continues to start automatically when Windows starts, you should scan for viruses and malware. See the next section for more info.
         To use the procedure above to stop a program from starting automatically, you need to have Windows 10 (Version 1803 or higher) installed. To see which version of Windows 10 your device is currently running, select the Start  button, then select Settings  > System  > About.
         If you have Windows 10 (Version 1709 or earlier) installed, press Ctrl + Alt + Delete, select Task Manager, select Startup, select the program you want to stop from starting automatically, then select Disable.
9. Check for and remove viruses and malware
A virus, malware, or malicious software could cause your PC to run slowly. Other symptoms include unexpected pop-up messages, programs that unexpectedly start automatically, or the sound of your hard disk constantly working.
The best way to handle viruses and malicious software is to try to prevent them by running antimalware and antivirus software and keeping it up to date. However, even if you take precautions, your PC can still become infected.
You can scan your PC for viruses or other malicious software by using Windows Security (formerly Windows Defender Security Center), which is included in Windows 10. For more info, see How to protect your Windows 10 PC.
Notes
         If you’re using other antivirus or anti-malware software, see the documentation for that program to learn how to scan for viruses. Also, make sure multiple antivirus programs aren’t running at the same time. If they are, choose the one you want to run, and then disable or uninstall any others.
         If you have another antivirus program installed and turned on, Windows Security will be turned off by default.
To scan for viruses using Windows Security (Windows 10 Version 1809 or later)
1.     Select Start   > Settings  > Update & Security  > Windows Security   and then select Open Windows Security.

2.     Select Virus & threat protection, then select Check for updates under Virus & threat protection updates.
3.     On the Protection updates screen, select Check for updates to make sure you have the most recent updates.
4.     Select Virus & threat protection, then select Quick scan.

Wait for Windows Security to finish scanning for viruses and malware.
5.     Do one of the following, depending on the results of the scan:
         Run the recommended advanced scan. This scan takes longer but searches more extensively for threats on your PC.
         If Windows Security finds a virus or malware and can’t remove or quarantine it, contact Microsoft Support for help.
         If no viruses are found, restart your PC and try to reproduce the performance problem you were having with your PC.
Note
If Windows Security doesn’t open, can’t update the definition file, or can’t finish scanning for viruses, try running Windows Defender Offline, which is explained below in To scan for malware and viruses with Windows Defender Offline (Windows 10 Version 1809 or later).
To see which version of Windows 10 your device is currently running, select the Start  button, then select Settings  > System > About.
10. Restore your PC from a system restore point
Restoring your PC undoes recent changes that might be causing problems. If you think a recently installed app, driver, or update for Windows could be causing problems, you might get things running normally again by restoring your PC to an earlier point, called a restore point.
Notes
         Restoring from a restore point won’t affect your personal files, but it will remove apps, drivers, and updates that were installed after the restore point was created.
         System restore works for changes made in the last 7 to 14 days.
To restore your PC from a restore point
1.     In the search box on the taskbar, type restore point, then select Create a restore point from the list of results.
2.     On the System Protection tab, select System Restore.
3.     Select Next, then choose the restore point related to the app, driver, or update that might be causing the problem. Then select Next > Finish.
4.     Restart your PC and see if performance has improved.
If you don’t see any restore points, it might be because system protection isn’t turned on.
To turn on system protection
1.     In the search box on the taskbar, type restore point, then select Create a restore point from the list of results.
2.     On the System Protection tab, select Configure.
3.     Select Turn on system protection > OK.

Friday, 30 August 2019

August 30, 2019

Change the default font or text color for email messages in Outlook

Change the default font or text color for email messages in Outlook


In Outlook, the default font is 11-point Calibri in black. It's used when you compose new email messages. You can change the default font and its color, size, and style — such as bold or italic.

Change the default font, color, style, and size for messages

  1. On the File tab, choose Options > Mail.
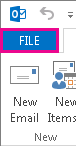
    The Outlook File tab
    Note: If you have Outlook 2007, choose the Tools menu, then choose Options > Mail Format.
  2. Under Compose messages, choose Stationery and Fonts.
  3. On the Personal Stationery tab, under New mail messages or Replying or forwarding messages, choose Font.
  4. In the Font box, choose the font, style, size, and color that you want to use. You can see a preview of your changes as you make them.
  5. Choose OK three times to return to Outlook.
Your new settings will take effect immediately.
Notes: 
  • You have to set your font preferences independently for both new messages and replies and forwards.
  • If the font that you choose isn't installed on the recipient's computer, then the recipient's mail program substitutes an available font.

Restore the initial default font style options

If you later decide you don't want to keep your custom font settings and want to return to the default settings, you can use the above steps, but choose the following values.
  • Font: +Body
  • Font style: Regular
  • Size: 11
  • Font color: Automatic

Change the font size for reading messages

You can change the size of messages in the Reading pane by using the Zoom feature.
To change the zoom level for a single message
  • Use the slider at the bottom right of the Reading pane to adjust your zoom level. As you adjust, the text size in the Reading Pane will increase or decrease.
To change the zoom level on all received messages
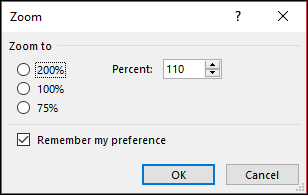
  1. You can now change the zoom level on all received messages. Click the percentage to the right of the Zoom slider to open the Zoom window.

    You can select your default zoom level.
  2. Select one of the default options or enter a specific percentage number.
  3. To apply this zoom level to all messages, check the Remember my preference check box and then click OK.

Thursday, 29 August 2019

August 29, 2019

Check spelling before sending a message in Outlook

Check spelling before sending a message in Outlook


In desktop versions of Outlook, you can check the spelling in your email message at any time by clicking Review > Spelling & Grammar.

To keep the Spelling & Grammar command always within reach, you can add it to the Quick Access Toolbar

If you don’t want to check spelling manually for every message—or you’re worried you might forget!—you can set Outlook to check spelling for you every time.


Click File > Options > Mail.


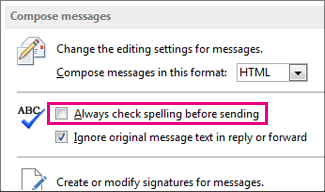
Under Compose messages, check the Always check spelling before sending box.


Now when you click Send, Outlook checks spelling automatically. If there are no spelling mistakes, it sends the message right away. If you change your mind and want to edit the message some more, click Cancel to stop the spell check, and then click No.
Spellcheck for Office 365 Outlook on the web

In Office 365 Outlook - Outlook on the web - there is no built-in spellcheck. Instead, use your web browser for spellcheck. Most web browsers such as Chrome, Internet Explorer, and FireFox have spellcheck. If your web browser doesn't have it, you can search the Internet to get the add-on for your browser.

If you're using Windows 8 or later, another option is to go to your PC Settings and search for Autocorrect misspelled words and Highlight misspelled words. Turn on both of these.


Wednesday, 28 August 2019

August 28, 2019

How to reset your Microsoft account password (Online)

How to reset your Microsoft account password (Online)


https://account.live.com/password/reset

Online

If you forgot the password you use to sign in to services like Outlook.com, Skype, OneDrive, and Xbox Live, you might need to reset it.
Here's how to do it:
1. Go to Recover your account and type the email address, phone number, or Skype name that needs a password reset. Then select Next.

2. We'll ask where you'd like to get your security code. Choose one of the alternate contact email addresses or phone numbers on this account. Then select Next.

3. Type the missing info to verify that it's really your email address or phone number. Next, select Send code.

4. We'll send the security code to the alternate contact you chose. If you don't see it, check your junk folder. If it's not there, you can select Use a different verification option.

5. Type the security code into Verify your identity, then select Next.

6. Reset the password for your Microsoft account by typing it into New password. Then confirm it by typing it again into Reenter password.


Friday, 16 August 2019

August 16, 2019

How to manage email messages by using rules in Outlook


How to manage email messages by using rules in Outlook


Rules allow you to move, flag, and respond to email messages automatically. You can also use rules to play sounds, move messages to folders, or display new item alerts.
The easiest and most common rule to create is one that allows you to move an item from a certain sender or with certain words in the subject line to another folder. You can create this rule directly from a message you've already received.
  1. Right-click a message in your inbox or another email folder and select Rules.
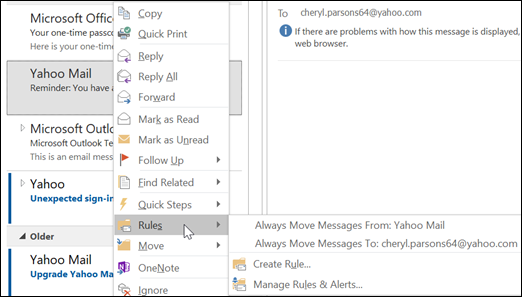
    Right-click a message you received to create a rule.
  2. Select one of the options. Outlook automatically suggests creating a rule based on the sender and the recipients. To view more options, select Create Rule.
  3. In the Create Rule dialog box, select one or more of the first three checkboxes.
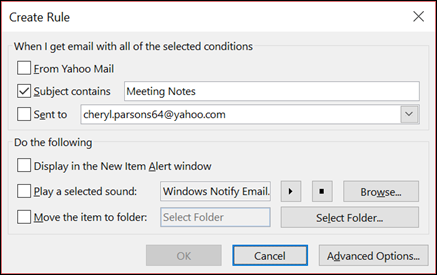
    Select Create Rule to create a new rule.
  4. In the Do the following section, if you want the rule to move a message to a folder, check the Move item to folder box, then select the folder from the Select Folder dialog that pops up, and then click OK.
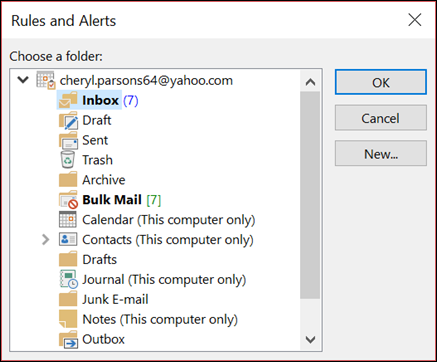
    You can move items to an existing or new folder.
  5. Click OK to save your rule.
    Note: If you want to run the rule on messages you've already received, check the box on the confirmation dialog that pops up and then click OK.

Create a rule using the Rules Wizard

There are three types of rules you can create with the Rules Wizard.
  • Stay organized: These rules help you filter, file, and follow-up with messages.
  • Stay up to date: These rules notify you when you receive a message that fits a specific set of criteria.
  • Custom rules: These are rules you create without a template.
Rules are almost infinitely customizable. There are a variety of options you can set for each type of rule you create. Use the following steps to learn how to create a rule using the Rules Wizard.
  1. Select File > Manage Rules & Alerts to open the Rules and Alerts dialog box.
  2. On the Email Rules tab, select New Rule.
  3. Select one of the templates from Step 1. To start from a blank rule, select Apply rule on messages I receive or Apply rule on messages I send.
  4. In the Step 2: Edit the rule description box, click on any underlined options to set them. For example, if you selected Flag messages from someone for follow-up in Step 1, click people or public group to select which senders' messages you want to flag, then click follow up at this time to select a flag and a follow up date.
  5. Click Next.
On the second page of the Rules Wizard, you can add additional conditions to your rule. For example, you can select messages sent from a specific person that also have specific words in the subject or message body.
  1. In the Step 1: Select condition(s) box, any condition you set on the previous screen is checked. You can select multiple additional conditions by checking their checkboxes.
  2. In the Step 2: Edit the rule description box, click on any additional underlined conditions you just added. Then click Next.
On the third page of the Rules Wizard, you can select additional actions to take on the message. For example, you can flag messages for follow up and mark a message as high importance.
  1. In the Step 1: Select condition(s) box, any action you set on the first screen is checked. You can select multiple additional actions by checking their checkboxes.
  2. In the Step 2: Edit the rule description box, click on any additional underlined actions you just added. Then click Next.
On the fourth page of the Rules Wizard, you can add any exceptions to your rule. For example, you can check except if it is marked as importance to ensure that any messages marked with a specific importance level aren't flagged for follow up.
  1. In the Step 1: Select condition(s) box, select any exceptions to your rule by checking their checkboxes.
  2. In the Step 2: Edit the rule description box, click on any additional underlined exceptions you just added. Then click Next.
  1. On the last page of the Rules Wizard, enter a name for your rule.
  2. If you want to run this rule on messages you've already received, check Run this rule now on messages already in "Inbox."
  3. By default, Turn on this rule is checked. You can uncheck this box if you don't want the rule to be turned on at this time.
  4. Click Finish to save and turn on your rule.

Delete a rule

You can delete a rule when it's no longer necessary.
  1. On the File tab, choose Manage Rules & Alerts.
  2. In the Rules and Alerts dialog box, on the E-mail Rules tab, choose the rule you want to delete.
  3. Choose Delete Delete icon > OK.

Run rules manually

You can manually run one or more rules.
  1. On the File tab, choose Manage Rules & Alerts, and on the E-mail Rules tab, choose Run Rules Now.
  2. In the Run Rules Now box, under Select rules to run, select the check box for each rule that you want to run.
  3. In the Run in Folder box, to select a different folder, choose Browse, choose the folder, and then choose OK.
    Select the Include subfolders check box to include all folders under the folder you chose in step 3.
  4. In the Apply rules to list, accept the default setting of all messages, or change to read or unread messages.
  5. Choose Run Now.

Server-based rules vs. client-only rules

There are two types of rules in Outlook—server-based and client-only.
  • Server-based rules  
    When you're using a Microsoft Exchange Server account, some rules are server-based. These rules run on your mailbox on the Exchange mail server even when Outlook isn’t running.

    Server-based rules must apply to messages when they are first delivered to your Inbox, and the rules must be able to run until they are completed on the server. For example, a rule that specifies that a message be printed can’t run until it is completed on the server. If a rule can’t be applied on the server, it is applied when you start Outlook and then becomes a client-only rule.
  • Client-only rules 
    Client-only rules are rules that run only on your computer. These are rules that run in Outlook instead of on the Exchange server. Client-only rules can only run when Outlook is running.
Tip: If your list of rules contains both kinds of rules, the server-based rules are applied first, followed by the client-only rules.


Apply rules to other Outlook items

Delivery receipts, voting responses, and Automatic Replies
When rules are applied, delivery receipts, read receipts, voting responses, and Automatic Replies (Out of Office notifications) are processed as if they're messages. A rule that moves messages with the word "meeting" in the Subject box to a specific folder, for example, also moves all delivery receipts, voting responses, or an Automatic Replies to that same folder.
Note: When a rule moves voting responses from the Inbox to another folder, vote tracking is affected. When a sent message that included a voting button is opened, the tracking information won’t include a tally for responses that a rule moved. Manually moving or deleting a response doesn’t affect tracking.
Meeting requests, task requests, and documents
Meeting requests, task requests, and documents are considered messages. If you create a rule that moves an item to a specific folder based on certain conditions (criteria) being met (matched), then any meeting and task request matching those conditions also is moved. Be aware, however, of the following limitations when you create rules that affect these kinds of items:
  • If an item is moved to a folder other than a mail folder, the item might not work as expected after it's moved. For example, if a message is moved to the Calendar folder, a new appointment isn’t created.
  • If a meeting or task response is moved to the Deleted Items folder by using a rule, the response isn’t tracked by the original item.
  • If a meeting request is automatically moved to the Deleted Items folder, the meeting isn’t added to the Calendar.
  • Rules that affect messages that you send aren’t applied to task requests and meeting requests.
Contact Groups
A rule that includes a Contact Group can behave differently than other rules depending on how the rule is created.
  • Move messages sent to a public group to a folder 
    This rule is available only if you're using an Exchange Server account. Only messages that are sent to the Contact Group are moved to the specified folder. Messages from people who are members of the Contact Group aren’t moved to the specified folder.