Networking & Computer Hacks, Android phone apps & Games

Showing posts with label Outlook. Show all posts

Wednesday, 12 February 2020

February 12, 2020

Create an email signature in Outlook


Create an email signature in Outlook
You can create personalized signatures for your email messages that include text, images, your electronic business card, a logo, or even an image of your handwritten signature. You can set it up so that signatures can be added automatically to all outgoing messages, or you can choose which messages include a signature.


Add a signature to messages

  1. On the Home tab, select New Email.
    New mail command
  2. Select the Message tab.
  3. In the Include group, select Signature, and then choose Signatures.
    Signature command
  4. Under Choose default signature, in the E-mail account list, select an email account to associate with the signature.
    Create a signature
  5. Under Select signature to edit, select New and type a name for the signature.
  6. Under Edit signature, type the signature that you want to use and select OK.
    Type a new signature to use in your email

Friday, 30 August 2019

August 30, 2019

Change the default font or text color for email messages in Outlook

Change the default font or text color for email messages in Outlook


In Outlook, the default font is 11-point Calibri in black. It's used when you compose new email messages. You can change the default font and its color, size, and style — such as bold or italic.

Change the default font, color, style, and size for messages

  1. On the File tab, choose Options > Mail.
    The Outlook File tab
    Note: If you have Outlook 2007, choose the Tools menu, then choose Options > Mail Format.
  2. Under Compose messages, choose Stationery and Fonts.
  3. On the Personal Stationery tab, under New mail messages or Replying or forwarding messages, choose Font.
  4. In the Font box, choose the font, style, size, and color that you want to use. You can see a preview of your changes as you make them.
  5. Choose OK three times to return to Outlook.
Your new settings will take effect immediately.
Notes: 
  • You have to set your font preferences independently for both new messages and replies and forwards.
  • If the font that you choose isn't installed on the recipient's computer, then the recipient's mail program substitutes an available font.

Restore the initial default font style options

If you later decide you don't want to keep your custom font settings and want to return to the default settings, you can use the above steps, but choose the following values.
  • Font: +Body
  • Font style: Regular
  • Size: 11
  • Font color: Automatic

Change the font size for reading messages

You can change the size of messages in the Reading pane by using the Zoom feature.
To change the zoom level for a single message
  • Use the slider at the bottom right of the Reading pane to adjust your zoom level. As you adjust, the text size in the Reading Pane will increase or decrease.
To change the zoom level on all received messages
  1. You can now change the zoom level on all received messages. Click the percentage to the right of the Zoom slider to open the Zoom window.

    You can select your default zoom level.
  2. Select one of the default options or enter a specific percentage number.
  3. To apply this zoom level to all messages, check the Remember my preference check box and then click OK.

Thursday, 29 August 2019

August 29, 2019

Check spelling before sending a message in Outlook

Check spelling before sending a message in Outlook


In desktop versions of Outlook, you can check the spelling in your email message at any time by clicking Review > Spelling & Grammar.

To keep the Spelling & Grammar command always within reach, you can add it to the Quick Access Toolbar

If you don’t want to check spelling manually for every message—or you’re worried you might forget!—you can set Outlook to check spelling for you every time.


Click File > Options > Mail.


Under Compose messages, check the Always check spelling before sending box.


Now when you click Send, Outlook checks spelling automatically. If there are no spelling mistakes, it sends the message right away. If you change your mind and want to edit the message some more, click Cancel to stop the spell check, and then click No.
Spellcheck for Office 365 Outlook on the web

In Office 365 Outlook - Outlook on the web - there is no built-in spellcheck. Instead, use your web browser for spellcheck. Most web browsers such as Chrome, Internet Explorer, and FireFox have spellcheck. If your web browser doesn't have it, you can search the Internet to get the add-on for your browser.

If you're using Windows 8 or later, another option is to go to your PC Settings and search for Autocorrect misspelled words and Highlight misspelled words. Turn on both of these.


Friday, 16 August 2019

August 16, 2019

How to manage email messages by using rules in Outlook


How to manage email messages by using rules in Outlook


Rules allow you to move, flag, and respond to email messages automatically. You can also use rules to play sounds, move messages to folders, or display new item alerts.
The easiest and most common rule to create is one that allows you to move an item from a certain sender or with certain words in the subject line to another folder. You can create this rule directly from a message you've already received.
  1. Right-click a message in your inbox or another email folder and select Rules.
    Right-click a message you received to create a rule.
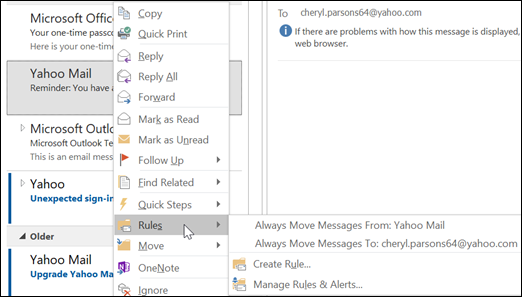
  2. Select one of the options. Outlook automatically suggests creating a rule based on the sender and the recipients. To view more options, select Create Rule.
  3. In the Create Rule dialog box, select one or more of the first three checkboxes.
    Select Create Rule to create a new rule.
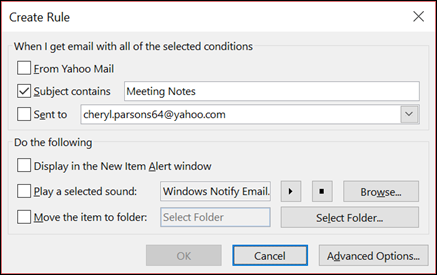
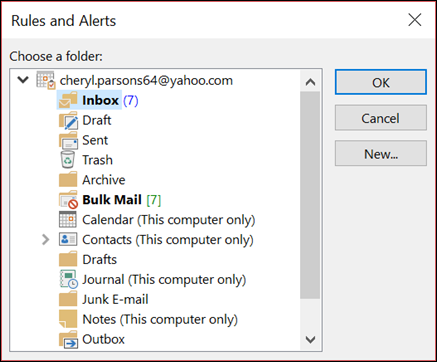
  4. In the Do the following section, if you want the rule to move a message to a folder, check the Move item to folder box, then select the folder from the Select Folder dialog that pops up, and then click OK.
    You can move items to an existing or new folder.
  5. Click OK to save your rule.
    Note: If you want to run the rule on messages you've already received, check the box on the confirmation dialog that pops up and then click OK.

Create a rule using the Rules Wizard

There are three types of rules you can create with the Rules Wizard.
  • Stay organized: These rules help you filter, file, and follow-up with messages.
  • Stay up to date: These rules notify you when you receive a message that fits a specific set of criteria.
  • Custom rules: These are rules you create without a template.
Rules are almost infinitely customizable. There are a variety of options you can set for each type of rule you create. Use the following steps to learn how to create a rule using the Rules Wizard.
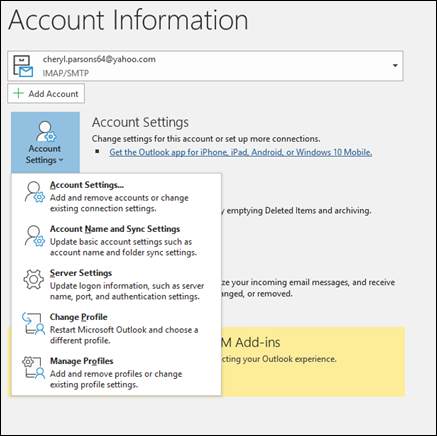
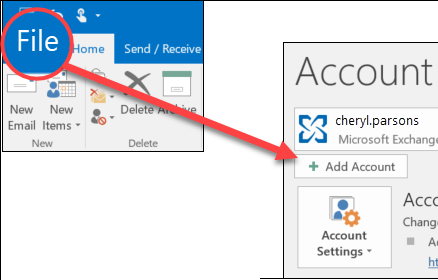
  1. Select File > Manage Rules & Alerts to open the Rules and Alerts dialog box.
  2. On the Email Rules tab, select New Rule.
  3. Select one of the templates from Step 1. To start from a blank rule, select Apply rule on messages I receive or Apply rule on messages I send.
  4. In the Step 2: Edit the rule description box, click on any underlined options to set them. For example, if you selected Flag messages from someone for follow-up in Step 1, click people or public group to select which senders' messages you want to flag, then click follow up at this time to select a flag and a follow up date.
  5. Click Next.
On the second page of the Rules Wizard, you can add additional conditions to your rule. For example, you can select messages sent from a specific person that also have specific words in the subject or message body.
  1. In the Step 1: Select condition(s) box, any condition you set on the previous screen is checked. You can select multiple additional conditions by checking their checkboxes.
  2. In the Step 2: Edit the rule description box, click on any additional underlined conditions you just added. Then click Next.
On the third page of the Rules Wizard, you can select additional actions to take on the message. For example, you can flag messages for follow up and mark a message as high importance.
  1. In the Step 1: Select condition(s) box, any action you set on the first screen is checked. You can select multiple additional actions by checking their checkboxes.
  2. In the Step 2: Edit the rule description box, click on any additional underlined actions you just added. Then click Next.
On the fourth page of the Rules Wizard, you can add any exceptions to your rule. For example, you can check except if it is marked as importance to ensure that any messages marked with a specific importance level aren't flagged for follow up.
  1. In the Step 1: Select condition(s) box, select any exceptions to your rule by checking their checkboxes.
  2. In the Step 2: Edit the rule description box, click on any additional underlined exceptions you just added. Then click Next.
  1. On the last page of the Rules Wizard, enter a name for your rule.
  2. If you want to run this rule on messages you've already received, check Run this rule now on messages already in "Inbox."
  3. By default, Turn on this rule is checked. You can uncheck this box if you don't want the rule to be turned on at this time.
  4. Click Finish to save and turn on your rule.

Delete a rule

You can delete a rule when it's no longer necessary.
  1. On the File tab, choose Manage Rules & Alerts.
  2. In the Rules and Alerts dialog box, on the E-mail Rules tab, choose the rule you want to delete.
  3. Choose Delete Delete icon > OK.

Run rules manually

You can manually run one or more rules.
  1. On the File tab, choose Manage Rules & Alerts, and on the E-mail Rules tab, choose Run Rules Now.
  2. In the Run Rules Now box, under Select rules to run, select the check box for each rule that you want to run.
  3. In the Run in Folder box, to select a different folder, choose Browse, choose the folder, and then choose OK.
    Select the Include subfolders check box to include all folders under the folder you chose in step 3.
  4. In the Apply rules to list, accept the default setting of all messages, or change to read or unread messages.
  5. Choose Run Now.

Server-based rules vs. client-only rules

There are two types of rules in Outlook—server-based and client-only.
  • Server-based rules  
    When you're using a Microsoft Exchange Server account, some rules are server-based. These rules run on your mailbox on the Exchange mail server even when Outlook isn’t running.

    Server-based rules must apply to messages when they are first delivered to your Inbox, and the rules must be able to run until they are completed on the server. For example, a rule that specifies that a message be printed can’t run until it is completed on the server. If a rule can’t be applied on the server, it is applied when you start Outlook and then becomes a client-only rule.
  • Client-only rules 
    Client-only rules are rules that run only on your computer. These are rules that run in Outlook instead of on the Exchange server. Client-only rules can only run when Outlook is running.
Tip: If your list of rules contains both kinds of rules, the server-based rules are applied first, followed by the client-only rules.


Apply rules to other Outlook items

Delivery receipts, voting responses, and Automatic Replies
When rules are applied, delivery receipts, read receipts, voting responses, and Automatic Replies (Out of Office notifications) are processed as if they're messages. A rule that moves messages with the word "meeting" in the Subject box to a specific folder, for example, also moves all delivery receipts, voting responses, or an Automatic Replies to that same folder.
Note: When a rule moves voting responses from the Inbox to another folder, vote tracking is affected. When a sent message that included a voting button is opened, the tracking information won’t include a tally for responses that a rule moved. Manually moving or deleting a response doesn’t affect tracking.
Meeting requests, task requests, and documents
Meeting requests, task requests, and documents are considered messages. If you create a rule that moves an item to a specific folder based on certain conditions (criteria) being met (matched), then any meeting and task request matching those conditions also is moved. Be aware, however, of the following limitations when you create rules that affect these kinds of items:
  • If an item is moved to a folder other than a mail folder, the item might not work as expected after it's moved. For example, if a message is moved to the Calendar folder, a new appointment isn’t created.
  • If a meeting or task response is moved to the Deleted Items folder by using a rule, the response isn’t tracked by the original item.
  • If a meeting request is automatically moved to the Deleted Items folder, the meeting isn’t added to the Calendar.
  • Rules that affect messages that you send aren’t applied to task requests and meeting requests.
Contact Groups
A rule that includes a Contact Group can behave differently than other rules depending on how the rule is created.
  • Move messages sent to a public group to a folder 
    This rule is available only if you're using an Exchange Server account. Only messages that are sent to the Contact Group are moved to the specified folder. Messages from people who are members of the Contact Group aren’t moved to the specified folder.

Thursday, 15 August 2019

August 15, 2019

How to configure Outlook using advance settings (POP or IMAP)

How to configure Outlook using advance settings

Add an email account using advanced setup

If you need to update your email account settings or set up your email account in Outlook manually, use the following steps.

Update your email settings in Outlook for Windows

Sometimes you need to make a change to your email account settings. If you have a new password, if your email provider has asked you to change settings, or if you're having problems with sending and receiving email, you can change your email account settings in a few steps.
  1. Open Outlook and select File.
  2. Use the drop-down under Account Information to select the account you want to change.
  3. Select Account Settings.
    You have multiple types of account settings you can change in Outlook.
  4. Select the type of information you want to change.
    • Account Settings allows you to add or remove accounts, change server settings, and more.
    • Account Name and Sync Settings lets you update the friendly name for the account and decide how many days' worth of email you'd like to synchronize.
    • Server Settings lets you change the login information, including the password, server name, port, and authentication settings.
    • Change Profile lets you switch to a new profile.
    • Manage Profiles lets you add or remove profiles or change profile settings.
  5. The most common settings you'll change are Server Settings.
    Select Server Settings to change your user name, password, and server settings.
  6. Select either Incoming mail or Outgoing mail to change a variety of server settings. This is also where you can update your email password (after you've changed the password with your email provider).
  7. When you're done updating your settings, select Next > Done.

Use advanced setup to add a POP or IMAP email account in Outlook for Windows

If you need to enter specific values for incoming and outgoing server names, port numbers, or SSL settings, you can use Outlook's advanced setup option. You can use these instructions to add a POP or IMAP account to Outlook.
  1. Open Outlook and select File > Add Account.
  2. On the next screen, enter your email address, select Advanced options, then check the box for Let me set up my account manually and select Connect.
  3. Select your account type. Most of the time when you need to use this option, you'll select IMAP.
  4. The Account settings screen should be pre-populated with most of the account settings you need. However, if you need to look up your settings, Enter your incoming and outgoing server settings and then select Next.
  5. Enter your password and then select Connect.

Use advanced setup to add a third-party MAPI email account to Outlook for Windows

If you are using a third-party MAPI provider, download and configure the MAPI email provider application as suggested by provider company.
  1. Open Outlook and select File > Add Account.
  2. On the next screen, enter your email address, select Advanced options, check the box for Let me set up my account manually, and select Connect.
  3. On the Advanced Setup screen, select Other.
  4. On the Other screen, choose the type of server to connect to from the list.
     Note: The Other option and your account type listed under it will only appear if you’ve properly installed and configured the MAPI provider.
  5. Click Connect.
  6. The third-party MAPI provider application installed on your machine should launch.
  7. Finalize the account setup by following the MAPI provider's instructions.

Tuesday, 13 August 2019

August 13, 2019

How to configure an email account in Outlook

How to configure an email account in Outlook.

There are many different types of email accounts you can add to Outlook, including Office 365, Gmail, Yahoo, iCloud, and Exchange accounts.

Some third-party email providers, like Gmail, Yahoo, and iCloud, require you to change some settings on their websites before you can add these accounts to Outlook.

These steps are the same whether you're adding your first email account or additional email accounts to Outlook.Select File > Add Account.

Select File, then Add Account.

What you see next depends on your version of Outlook.

For Outlook for Office 365 and Outlook 2016
For Outlook 2013 and Outlook 2010

Enter your email address and click Connect.

Enter your name, email address, and password.
Enter your name, email address, and password, and click Next.
If prompted, enter your password again, then select OK > Finish to start using your email account in Outlook.


Outlook won't accept my password

If Outlook won’t accept your password and you know you’re using the password for your email account, you might have an email account that requires additional security.
Gmail, Yahoo, iCloud, Outlook.com, and AOL accounts all use two-factor authentication to help verify that you’re the person trying to access your email account.
To add your email account to Outlook, you’ll need an app password, also known as an application password. This is a different password than your regular email account password. One way you'll know you need an app password is if you see the following message: 2-factor authentication is set up for your account. Please sign in using your application password.