Computer & Networking Hacks

Networking & Computer Hacks, Android phone apps & Games

Saturday, 11 November 2023

November 11, 2023

Enhancing Windows Security: Speculative Execution Configuration Check Fixed


 Hello Windows Enthusiasts!


We understand the importance of keeping your Windows operating system secure, and that's why we're here to share valuable insights on a powerful security measure: Speculative Execution Configuration.


Speculative Execution is a performance optimization feature in modern processors that predicts and executes instructions before they are officially needed. While this boosts overall system speed, it has also raised security concerns. To help you fortify your Windows system against potential vulnerabilities related to speculative execution, we're introducing a simple yet effective configuration check.


Windows Speculative Execution Configuration Check

To implement this configuration, we'll be adding a specific registry key. Follow the steps below to ensure your Windows system is fortified against potential speculative execution vulnerabilities.


Step 1: Open Notepad


Open Notepad on your Windows system. You can do this by searching for "Notepad" in the Start menu or using the Run dialog (Win + R) and typing "notepad."


Step 2: Copy and Paste the Registry Key


Copy the following registry key information and paste it into Notepad:


plaintext

Copy code

Windows Registry Editor Version 5.00


[HKEY_LOCAL_MACHINE\SYSTEM\CurrentControlSet\Control\Session Manager\Memory Management]

"FeatureSettingsOverrideMask"=dword:00000003

"FeatureSettingsOverride"=dword:00002048

Step 3: Save the File


Save the file with a ".reg" extension. For example, you can name it "SpeculativeExecutionConfigCheck.reg." Ensure that you select "All Files" as the file type when saving.


Step 4: Run the Registry File


Double-click on the saved ".reg" file and confirm any prompts that appear. This will add the specified registry key to your Windows system.


Congratulations! You've now enhanced your Windows security by configuring speculative execution settings.


Why This Matters

By configuring speculative execution settings, you add an additional layer of defense against potential security threats. This measure helps safeguard your system by controlling how speculative execution is handled.


We recommend performing this configuration check regularly, especially after major updates or changes to your system, to ensure your Windows OS remains secure.


Stay secure, stay informed!


Note: Modifying the Windows Registry can impact system stability. Ensure you have a backup before making changes and consult with IT professionals if needed.

Friday, 10 November 2023

November 10, 2023

Mitigating WinVerifyTrust Signature Validation CVE-2013-3900 Vulnerability with Batch File

 In the realm of cybersecurity, staying ahead of potential threats is crucial to maintaining a secure computing environment. One vulnerability that has caught the attention of security experts is the WinVerifyTrust Signature Validation CVE-2013-3900. To mitigate this vulnerability, one effective solution involves creating and implementing a batch file to adjust specific registry values. This post will guide you through the process.


Step-by-Step Guide: Creating Batch File for WinVerifyTrust Signature Validation CVE-2013-3900 Mitigation


1. Open a Text Editor

Begin by opening a text editor of your choice, such as Notepad or any code editor.


2. Copy and Paste the Batch Script

Copy the following batch script into your text editor:


batch

Copy code

@echo off


REM 32-bit registry path

set RegPath32=HKEY_LOCAL_MACHINE\Software\Microsoft\Cryptography\Wintrust\Config


REM 64-bit registry path

set RegPath64=HKEY_LOCAL_MACHINE\Software\Wow6432Node\Microsoft\Cryptography\Wintrust\Config


REM Set the value for EnableCertPaddingCheck

set Value=1


REM Add and enable registry value for 32-bit system

reg add "%RegPath32%" /v EnableCertPaddingCheck /t REG_DWORD /d %Value% /f


REM Add and enable registry value for 64-bit system

reg add "%RegPath64%" /v EnableCertPaddingCheck /t REG_DWORD /d %Value% /f


echo Registry values added and enabled successfully.

pause

3. Save the File

Save the file with a ".bat" extension. For example, you could name it "CVE-2013-3900_Mitigation.bat".


4. Run the Batch File as Administrator

To apply the mitigation, right-click on the saved batch file and choose "Run as Administrator." This ensures that the script has the necessary permissions to modify the registry.


5. Verify the Changes

After running the batch file, you can verify the changes by checking the registry entries at the specified paths. The value for "EnableCertPaddingCheck" should now be set to "1."


Conclusion

By following these steps, you've created and executed a batch file to mitigate the WinVerifyTrust Signature Validation CVE-2013-3900 vulnerability. Regularly monitoring and addressing such vulnerabilities are crucial components of a robust cybersecurity strategy.


Note: Modifying the registry can have system-wide effects, so it's essential to exercise caution and create a backup before making any changes.


Stay vigilant, stay secure!

Thursday, 17 November 2022

November 17, 2022

How to enable multiple RDP Sessions

 How to enable multiple RDP Sessions


Enable Multiple RDP Sessions

  • Log into the server, where the Remote Desktop Services are installed.
  • Open the start screen (press the Windows key) and type gpedit.msc and open it.
  • Go to Computer Configuration > Administrative Templates > Windows Components > Remote Desktop Services > Remote Desktop Session Host > Connections.
  • Set Restrict Remote Desktop Services user to a single Remote Desktop Services session to Disabled.
  • Double click the Limit number of connections and set the RD Maximum Connections allowed to 999999.

Disable Multiple RDP Sessions

  • Log into the server, where the Remote Desktop Services are installed.
  • Open the start screen (press the Windows key) and type gpedit.msc and open it.
  • Go to Computer Configuration > Administrative Templates > Windows Components > Remote Desktop Services > Remote Desktop Session Host > Connections.
  • Set Restrict Remote Desktop Services user to a single Remote Desktop Services session to Enabled.

Friday, 14 February 2020

February 14, 2020

How to create a PivotTable in Excel

How to create a PivotTable in Excel


A PivotTable is a powerful tool to calculate, summarize, and analyze data that lets you see comparisons, patterns, and trends in your data.

Create a PivotTable

  1. Select the cells you want to create a PivotTable from.

    Note: Your data shouldn't have any empty rows or columns. It must have only a single-row heading.
  2. Select Insert > PivotTable.
           Pivot Table
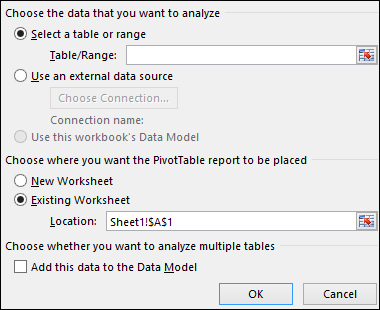
  3. Under Choose the data that you want to analyze, select Select a table or range
           Pivot Table
  4. In Table/Range, verify the cell range.
  5. Under Choose where you want the PivotTable report to be placed, select New worksheet to place the PivotTable in a new worksheet or Existing worksheet and then select the location you want the PivotTable to appear.
  6. Select OK.

Building out your PivotTable

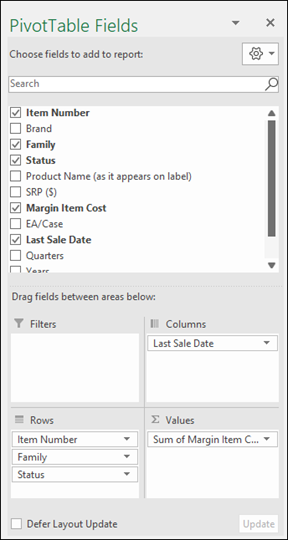
  1. To add a field to your PivotTable, select the field name checkbox in the PivotTables Fields pane.
    Note: Selected fields are added to their default areas: non-numeric fields are added to Rows, date and              time hierarchies are added to Columns, and numeric fields are added to Values.
    Pivot Table
  2. To move a field from one area to another, drag the field to the target area.

Wednesday, 12 February 2020

February 12, 2020

Create an email signature in Outlook


Create an email signature in Outlook
You can create personalized signatures for your email messages that include text, images, your electronic business card, a logo, or even an image of your handwritten signature. You can set it up so that signatures can be added automatically to all outgoing messages, or you can choose which messages include a signature.


Add a signature to messages

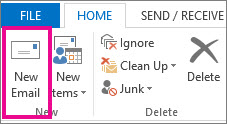
  1. On the Home tab, select New Email.
    New mail command
  2. Select the Message tab.
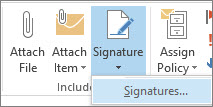
  3. In the Include group, select Signature, and then choose Signatures.
    Signature command
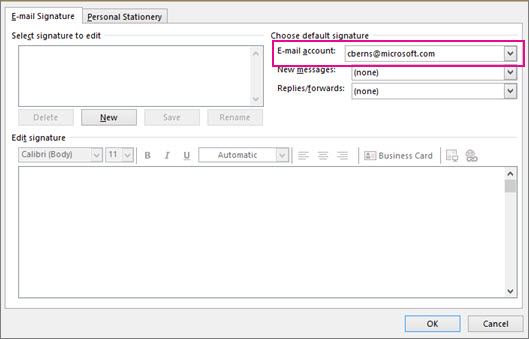
  4. Under Choose default signature, in the E-mail account list, select an email account to associate with the signature.
    Create a signature
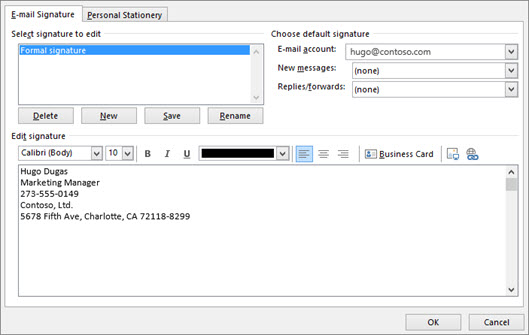
  5. Under Select signature to edit, select New and type a name for the signature.
  6. Under Edit signature, type the signature that you want to use and select OK.
    Type a new signature to use in your email

Friday, 27 December 2019

December 27, 2019

How to perform a clean boot in Windows 10


How to perform a clean boot in Windows 10


How to perform a clean boot in Windows 10

These steps might look complicated at first glance, but following them in order, step-by-step, will help you get you back on track.

Sign in to the computer as an administrator

In the search box on the taskbar, type msconfig and select System Configuration from the results.


Important If the computer is connected to a network, network policy settings might prevent you from following these steps. Only use the System Configuration utility to change the advanced boot options on the computer with guidance from a Microsoft support engineer. Using the System Configuration utility might make the computer unusable.


On the Services tab of System Configuration, select Hide all Microsoft services, and then select Disable all.


On the Startup tab of System Configuration, select Open Task Manager.


Under Startup in Task Manager, for each startup item, select the item and then select Disable.


Close Task Manager.

On the Startup tab of System Configuration, select OK. When you restart the computer, it's in a clean boot environment. Your computer might temporarily lose some functionality while in a clean boot environment.